Monday, February 27, 2017

CONTRAST: A KEY TO GREAT DESIGN

A dark setting gives this
lovely stained glass piece
all the more power.
Imagine a symphony whose movements are all exactly the same loudness and tempo. Without the contrast of allegretto and andante, piano and forte, the music would quickly sink into deadly dullness. Contrast holds the same importance to architecture. It provides the unexpected twists and turns that can transform a bland design into a powerful one—to turn, as it were, Muzak into Beethoven’s Fifth.

Contrast works by heightening the perceived difference between sensations. Suppose it’s a sweltering summer day, and you walk off the scorching sidewalk into an air-conditioned building. You, being hot and bedraggled, will appreciate the coolness a lot more than the people who’ve already been inside all day.

In the same way, your senses can best appreciate architectural effects when they’re contrasted against their opposites. There are lots of ways to accomplish this. Here are just a few:

Architect Louis Sullivan was a master at wringing
the maximum impact from ornament using contrast.
Here, the ornate bullseye window practically explodes
from the building's otherwise plain facade.
(Merchant's National Bank, Grinnell, Iowa; 1914)
•  Bright/dark. While a uniformly dark home would no doubt be depressing, a uniformly bright one might just as easily bore you to death. To create visual interest, bright rooms should be played off darker ones. Besides creating variety, the contrast between these opposites heightens the impact of each. That’s the basic premise of using contrast.

•  Plain/ornamented. The architect Louis Sullivan was a master of this type of contrast. His buildings were often composed of powerful masses of bold, rough stone. But against this background Sullivan would add decorative panels of incredible delicacy and color in a few key areas, creating the perfect balance between coarseness and refinement.

The same lesson holds true today: Ornament run wild is not much better than none at all.  To be effective, highly decorative surfaces should be contrasted against plain ones.
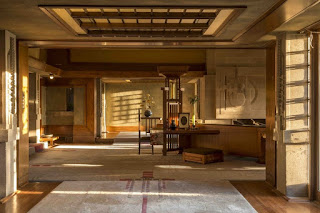
At Frank Lloyd Wright's Hollyhock House
in Los Angeles, a low entry ceiling—barely higher
than the doorways—supercharges the drama of entering
the soaring living room. (1921)
•  High/low.  Many homes of the Fifties were built with uniform eight-foot ceilings throughout.  When people grew tired of this sameness, vaulted ceilings became the rage, and often whole houses were built with lofty, slope-ceilinged rooms. The ideal lies somewhere between these two extremes, since the impact of a high ceiling is quickly lost if there isn’t a lower ceiling nearby for contrast.

In his First Church of Christ, Scientist,
Bernard Maybeck combined hard
industrial materials such as concrete
columns and steel sash windows,
but tempered it all with lavish,
wisteria-laden wood trellises.
(1910)
Frank Lloyd Wright frequently dropped the ceilings of his entrance foyers to uncomfortably low, hat-scraping levels. Imagine the sense of impact (and relief) when the visitor suddenly stepped out into the soaring space of a vaulted living room.

Although most building codes now require a minimum ceiling height of 7’-6” (7’-0 in kitchens, bathrooms and halls), Wright’s trick is still effective today. Try playing high-ceilinged living rooms against cozy alcoves, for example, or vaulted master bedrooms against intimate baths.

•  Soft/hard.  Landscape architects have long been familiar with the importance of contrasting plants against “hardscaping” such as brick or stone. Architectural interiors can benefit from the same contrasts. During the Victorian era, interiors were smothered in tapestries, rugs, velvet drapes, and overstuffed furniture.  A hundred years later, during the Eighties, it was fashionable to design ascetic interiors with bare hardwood floors and uncurtained windows. The result was rooms that were cold, harsh, and uninviting. As usual, the secret lies in between. There should be just enough hard surfaces to make the soft ones appreciated.

Tuesday, February 21, 2017

RECESSED LIGHTING BASICS

Low-voltage recessed lighting fixtures used to illuminate
art on a wall.
Recessed lighting used to show up mainly on department store ceilings. In the last few decades, though, it’s grown very popular in residential design as well, and no wonder. It’s flexible, unobtrusive, and relatively cheap—some fixtures start at less than $50.  

Basically, recessed lighting consists of cylindrical “cans” recessed into the ceiling plane.  A rough metal housing installs above the ceiling and contains the mounting hardware, lamp socket, and any necessary electrical hardware. A separate bezel or “trim”  finishes the ceiling opening.   The various trims are what distinguish one fixture type from another, since the housings concealed in the ceiling are all basically similar.  
Slope-ceiling fixture with black Coilex baffle
to reduce specular glare.

The most common type of recessed fixture is an open-bottomed can containing a lamp (the technical term for light bulb) that’s “regressed” a few inches above the ceiling plane.  The portion of the can interior that’s visible around the lamp can be either polished (specular) or fitted with a ribbed, black baffle (“Coilex”) to reduce eye-irritating reflections. A number of other specialized trims are available:  

•  Louvered trims having egg-crate grilles or concentric rings are used to achieve “cutoff” or shielding of the light source, and to direct light downward.

•  Various types of  lenses are available to cover the fixture opening, including   translucent glass, plastic, and Fresnel. Gasketed, moisture-resistant lenses are available for bath or shower areas.
Gasketed fixture with Fresnel lens
can be installed in the shower.

•  Wall washers use a special shielded trim to illuminate or “wash” wall surfaces, so that the wall itself becomes a dramatic indirect light source. They’re generally installed about 24” away from the wall, and spaced about twice that distance from each other.   

•  Trims having small-aperture slots or pinholes are available for concentrating light on specific objects or areas.
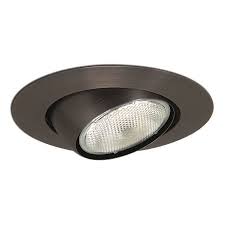
Classic eyeball spot,
a mid-century favorite.

•  Eyeball spots (which require a special type of rough fixture) have a lamp installed in a spherical socket that allows aiming.  Eyeballs are useful for spotlighting particular objects or areas, and for installation in sloped ceilings.

•  Fixtures with angled bottom edges are also available for installation in sloped ceilings.  They feature vertically-oriented cans with elliptical trims that eliminate awkwardly angled light beams or protruding eyeball trims.

Many of the above fixtures are also available in low-voltage versions that use high-intensity lamps.  There are also special recessed fixtures designed for retrofitting into existing ceilings; they install through the hole cut for the trim. 
Wall washers (at background) provide dramatic illumination
of the textured stone, without annoying glare.

With so many configurations available, you can really go wild with recessed lighting—sometimes too wild.  Here are a couple of important caveats:

•  Choose trims according to performance, not just looks. For example, plain recessed fixtures with specular reflectors look great but can create unpleasant glare or “hot spots”. If you want the light source to be less obtrusive, consider baffled trims or use Coilex-baffled fixtures instead.   

•  Lay the fixtures out carefully. Most people simply place recessed fixtures according to what they'll be lighting on the floor. Unfortunately, the resulting arrangements often look cluttered and haphazard when viewed in the context of the ceiling—the infamous "swiss cheese effect". While you should obviously consider the room’s lighting requirements, it’s also important to arrange the fixtures so that they produce some kind of rational pattern on the ceiling.   


Monday, February 13, 2017

"ECHOING": The Key to a Seamless Addition

Nothing here worth "echoing"? Au contrare, my friend!
The lap siding, shutters, pedimented porch roof, and
flanking brick chimneys are all good candidates
to be repeated in an addition.
 “Echoing” is a simple and highly effective design trick architects use to visually tie an addition to the existing building.  It involves searching out the small details that are unique to the original building and echoing them (reproducing them in their original or a slightly modified form) in the new work. Judiciously chosen, these echoed details help create a seamless addition without costing a fortune.

Often, when I suggest echoing the style of the existing house in their addition, my clients respond, “But our house doesn’t have any style!”   In fact, regardless of how humble you think your home is, it probably has plenty of style once you’re alert to it.  It’s just that living in a home for any length of time tends to make one immune to its charms.

The real trick is finding what to echo. To do this, try to look at your home with fresh eyes. What details make it different from the neighbor’s house? Perhaps the porch railings or the gable vents? How about the trim around the front windows? Homes from particular stylistic eras have lots of characteristic details that can be effectively echoed.  Here are some common ones:

Spanish Revival homes, like other Romantic Revival styles,
offer a wealth of details for echoing. Repeating details such as
the clay tile, arches, clay pipe vents, and ironwork
will practically guarantee a seamless addition.
•  In Victorian homes, echoing elements such as fish-scale shingle, cornices, and finials will go a long way toward integrating an addition. However, while Victorians have a wealth of detail that can be echoed, they also demand scrupulous reproduction in order to be successful. Two-dimensional renditions of highly-modeled details will look papery and cheap.

Note that the overall scale of the addition—window size and proportion, ceiling height, and massing   —should be in keeping with the original building as well. This rule invariably applies to any addition that's meant to blend in.

•  Colonials are much simpler to echo. Their characteristic details, such as columned porches, boxed cornices, and divided-lite windows with shutters, can all be easily and inexpensively reproduced with modern materials.

• Bungalow style homes have very characteristic front porches with stout "elephantine" columns and, often, unusual gable vents, porch balustrades, and the like, yielding plenty of details that can be echoed in the new work.

• Revival styles such as Spanish, Normandy, and Tudor, present the most specialized cases. Their builders took considerable pains to create highly original details for each, and hence no two are quite alike.  Look for details such as wrought iron grilles; round chimneys, or ones made of brick interspersed with stone; attic vents made from clay pipe or barrel tiles; and unusual stone or brick decoration around entrances.  Then, echo these in the addition where appropriate.  

California Rancher have lots of echo-able features. In this example,
some of the "must-have" details include the low-pitched shingle roof,
the used brick detailing, window shutters, and classic
items such as the "kickers" holding up the ends of the roof gables.
•  California Ranchers have a whole slew of neat details which have grown more charming with the passage of time.  Many ranchers featured countrified “crossbuck” X-motifs on porch railings and door panels, as well as diagonal knee braces or “kickers” near the top of porch posts. The more elaborate among them had projecting beams supporting the bargeboards and shamelessly phony “birdhouses” on the garage gable or astride the roof ridge. All of these details are relatively simple and inexpensive to reproduce in the addition.

•  Many of today's contemporary home styles are once again featuring “traditional" details such as heavy stucco or wood columns, heavy window trim, and windows with divided lites, making it easy to echo their designs. Better yet, it’s likely you’ll still find the exact same materials that the contractor used.

Monday, February 6, 2017

MODULAR CABINETS: Are They Better Than Custom?

Years ago, each time a craftsman set out to build some cabinets, he started from scratch. There were no agreed-upon standards for cabinet sizes, so he might make a sink cabinet 37” wide for one kitchen and 43” wide for another.  He might even make the countertop higher or lower, depending on the stature of the homeowner.
Modular cabinets are sort of like Lego blocks: They can
be put together in many different ways, and
still fit together well.

All this customization was great—if you could afford it.

Today, the advent of modular cabinetry has made decent-quality cabinets much easier on the pocketbook.  Unlike custom cabinets, the dimensions of modulars are standardized so they can be mass-produced.  That, of course, means lower cost to the consumer: a bare-bones, modular 36” base cabinet can start as low as $120.  For more elaborate styles, you can still figure on paying about half to two-thirds of what a custom cabinet would cost.

Countless accessories are available with
modular cabinets, many of which can
really boost your storage space.
Designing with modulars is easy. Their widths are always a multiple of 3”. If you have a space, say, 11’-7 1/2” wide available for cabinets, you simply choose an arrangement of modulars that’ll fill up as much of the space as possible. For this example, the largest total width possible is 11’-6”, since that’s the biggest multiple of 3” that fits in 11’-7 1/2”. The slight gap left over at each end is closed in with a strip of matching wood called a “filler”.

Modular cabinets have standardized heights, too. Base cabinets for kitchens are built to yield a 36” counter height. Wall cabinets are generally available in 30”, 36”, and 42” heights (corresponding to 7’, 7’6”, and 8’ ceilings), as well as in special sizes made for installation above refrigerators, ranges, and peninsulas. A variety of bathroom vanities are also available.

As in any mass-produced product, there have been some compromises in materials and workmanship—particle board and plastic shelf brackets are common, especially in the cheaper lines. On the plus side, the finish quality of good modulars is often better than that of custom units.

Wine racks, shadow boxes, and glass doors are
just a few of the goodies you can experiment
with in your modular kitchen design.
Designing with modular cabinets is a bit like playing with Lego blocks: no matter how you arrange them, they always fit together. Of course, they still have to be arranged properly, so if you’re not familiar with basic kitchen design conc epts, consult a kitchen designer, an architect, or a good kitchen design book.

Here are some easy steps to laying out a modular kitchen:

•  First, choose a cabinet manufacturer that suits your budget and offers the type of accessories you want. For example, some manufacturers provide pull-out shelves as standard equipment in base cabinets; others don’t offer them at all.
The finishing touch: An incredible
selection of door and hardware
combinations means there's
something for everyone.

•  Next, decide on the location of the range and/or oven, the sink, and the refrigerator.  These placements are critical, so get help here if you need it. Once you’ve figured out the basic arrangement, you can experiment with various accessories.  Most modular cabinet manufacturers offer interesting add-ons such as knickknack shelves, wine racks, and range hoods in matching finishes. Beware, however — like new-car options, these items can get very expensive.

•  Determine where you’d like specialized cabinets such as drawer stacks, tray cabinets, or full-height pantry cabinets. Also, if your cabinets will turn a corner, decide between a lazy susan cabinet or a “blind” cabinet with a conventional door. Refer to the manufacturer’s literature for the available sizes and types.

• Finally, choose your favorite door style and surface finish from the manufacturer’s catalog. Oh, and when your kitchen’s done, how about baking me a nice pie?