Tuesday, June 26, 2018

GETTING A HANDLE ON LOCKSETS

No "limp fish" handshake here.
(Image courtesy of Old House Journal)
An old teacher of mine always insisted that a firm handshake was critical to making a good impression. “Don’t give ‘em the old limp fish,” he’d warn us. It’s not much of a stretch to say that your home’s locksets (what most people call doorknobs) should show the same fortitude. After all, locksets are the part of your house that everybody shakes hands with.

That’s why even the most frugal developers will usually spring for a top-quality lockset at the front door. They know that it’s the first thing a buyer will touch, and that a favorable first impression here will carry over to the rest of the house.

Given all this, it’s worth choosing your locksets carefully, and not just grabbing an armful of cheapies at the local discount emporium. If your budget can’t handle top-flight locksets throughout the house, then the front entrance lockset is the place to splurge.

Lever handle lock in satin nickel finish.
But can you tell me the finish code?
When choosing a lockset, look for a good solid feel. The motion of the latch mechanism should be smooth and firm, not gritty or tinny. The knob itself should have minimal wobble and should feel heavy, not flimsy and hollow. In general, avoid locksets labeled “builder’s special” or the like; they’re the low-line models. And don’t fall for beefy American-sounding brand names without checking the fine print first: many junky imported brands will try to flim-flam you with a name right out of the Rust Belt.

Here’s a quick rundown of common lockset types:


Standard hardware finish codes, courtesy of Schlage.
•  Entrance locksets usually feature some kind of fixed handle with a thumb latch, and often incorporate a deadbolt as well. Stick to a style that suits your home’s architecture—the model name often gives a good clue—and buy the very best brand you can afford. The front door is no place to cut corners. Besides, with all the wear and tear locksets have to endure, a quality brand is worth the extra investment..

Your basic privacy lock, shown au naturel.
This one is in Finish 612, Satin Bronze.
•  The most common type of in type of interior lockset is the passage lock, which in fact can’t be locked at all. The privacy lock, on the other hand, has a push button, turn button, or lever that allows the door to be locked from one side. A dummy lock is a non-operational doorknob and escutcheon (trim plate) that’s solidly fixed to the door. It’s sometimes used in closets, where a protruding inside doorknob might interfere with stored items.

•  Lever-handle locksets, favored throughout Europe for centuries, found their first widespread use here in disabled-accessible buildings. However, their good looks and practicality—you can still operate them with your hands full—have made them a popular alternative to knob-type locksets. A full range of designs, locking functions, and finishes are available.

A substantial front entrance makes an impression
that carries over throughout the house.
•  Locksets come in a huge range of finishes, but only the most common—bright chrome, satin chrome, polished brass, satin brass, and satin bronze—are readily available at hardware stores. Blackened finishes (commonly known as antiqued) are coated with black paint and then polished, leaving highlights that emphasize their form.

Additional finishes, such as hammered iron, bright bronze, and oil-rubbed bronze, are available at a higher cost. Perishable finishes such as brass and bronze are usually lacquered, which temporarily preserves their just-polished look. Unfortunately, the lacquer eventually wears off in spots, allowing the finish to oxidize in an unattractive mottle fashion. Personally, I prefer to forego lacquering and allow the bare metal to form a permanent oxide coating, which will acquire natural highlights over the years.


Monday, June 18, 2018

A LEXICON OF LUMBER

Studs: They're a lot easier to find when the room looks
like this. Otherwise, buy a good studfinder.
Watch any of those popular home-improvement shows on television, and you’ll ’ll be assaulted by a barrage of arcane carpentry terms. Given that it’s a sort of badge of honor among do-it-yourselfers to know their studs from their stools—as it were—I humbly offer the following primer:

•  Stud. We’ll start with an easy one, what? Anyone who’s ever hung a picture knows that a stud is one of the vertical 2x4s that make up the wall framing. They’re usually spaced 16” apart (or “on center”, as architects and builders like to put it).  However, knowing what a stud is is one thing; finding one is another. A sharp rap on the wall with a knuckle will do for the experienced; for the rest of us, an electronic studfinder is a better choice.

Pressure treated 2x4 lumber as now
used for mudsills in place of redwood.
Some is dark brown; some is greenish;
some has telltale needle marks
like this does.
•  Mudsill. Like many carpentry terms, this one has a quaint Middle Ages ring to it. It refers exclusively to the special piece of 2x4 or 2x6 lumber that’s placed directly on top of the concrete foundation wall—a location highly vulnerable to moisture and insect attack. Prior to World War II, the mudsill was usually made of redwood to resist the effects of termites and rot. Because redwood is so pricey now, it's been replaced by pressure treated lumber. This is just ordinary Douglas Fir with a preservative injected into it, which explains why it has all those needlemarks.

A header beam carries the load of upper floors or roofs
whereever there is an opening in a wall,
such as a door or window.
•  Joist. Now here’s a word with a nice creaky sound that’s perfectly suited to its meaning. A joist is one of the narrow beams that supports your floor. Like studs, joists are spaced 16” on center; they range in size from 2x6 to 2x12, depending on the load they carry and the distance they span. And by the way—it’s usually not the joist that creaks, it’s a piece of the subflooring rubbing against against its neighbor.

•  Header. This is the elusive critter you hunt for when you’re hanging curtain rods. Most people have heard of it, but because it’s hidden by drywall, they’re not quite sure what it looks like or what it’s for. A header is simply a heavy wooden beam—nowadays usually a 4x12—that bridges a door or window opening and carries the load above it.

The part of the rafter that stick out past the exterior wall
is variously known as a lookout, an outlooker,
or a rafter tail, depending on where
the carpenter comes from.
•  Stool.  Here’s a puzzling one. Stool is the technical term for that piece of wood across the bottom of a window opening—the one any normal person would call a sill. In the building trades, however, sill only applies to the stool’s counterpart on the outside of the wall.  Oh, and that little piece of trim beneath the stool?  Why, that’s the apron, of course.

•  Outlooker, rafter tail, lookout. Carpentry terms vary a lot by region—a fact that’s nowhere as evident as in these terms. All of them refer to the part of the rafter that projects past the outside wall and is visible under the eaves. While they’re all charming terms, “rafter tail” is my favorite, because it jibes delightfully with the carpenter’s name for the wee notch in the rafter where it crosses the outside wall: birdsmouth cut.

•  Ledger. Maybe you’ve already guessed that this term doesn’t relate to bookkeeping—something both contractors nor architects are famously bad at. In carpentry, a ledger is a piece of 2x lumber that’s attached to the face of a wall to support some other structure—the floor of a deck, for example.  I suppose it derives from “ledge”, which is sort of what it creates. So why isn’t it just called a “ledge”?

Look, I just write about this stuff, I don’t invent it.

Monday, June 11, 2018

WAY BETTER WINDOWS

German windows—the Mercedes Benz of fenestration.
With the handle in one position, the sash tilts in;
in another, it opens like a casement. When closed,
it sealed flat-out airtight.
I never saw a serious window until I visited Germany during the 1980s. It was a revelation to find that German windows were built with the same Teutonic solidity as a Mercedes-Benz. They were massive, with broad, heavy frames of wood or polished aluminum joined with perfectly mitered corners. The lock hardware was both substantial and practical: with the handle in one position, the window tipped inward for ventilation; in another, it opened like a normal normal casement. Most importantly, when locked, the window was sealed virtually airtight against the elements. 

With Germany’s harsh climate and high energy costs, weathertight, energy-efficient windows have always been indispensable. Not so here in the States: as little as thirty years ago, the average tract house window still consisted of flimsy aluminum frames, with a single sheet of 3/16” glass, hit-or-miss gasketing, and rinkydink extruded hardware. These windows were affordable in first cost, but in terms of energy efficiency, they were little better than a hole in the wall. But back then, who cared? America got its energy dirt cheap. From Boise to Buffalo, the remedy for a cold, leaky house was simple—turn up the thermostat. 

By contrast, this is what most American homes had just
thirty years ago: Flimsy, leaky, aluminum dreck.
As energy prices began their inexorable climb, however, people suddenly realized how much of their heating dollar was literally going out the window. At least one progressive state government woke up to this fact as well. In 1978, California, then under the first two terms of Governor Jerry Brown, enacted Title 24, which mandated that new homes maintain a minimum level of energy efficiency. Despite the usual bellyaching over government intrusion into private business, it was the granddaddy of energy-efficiency legislation, and numerous states eventually followed suit. 

Only then did window manufacturers finally recognize the huge market for a window that was both affordable and energy-efficient. Nowadays, the best U.S.-made examples are just about on par with their German cousins, both in energy efficiency and construction quality. Some of the features to look for:

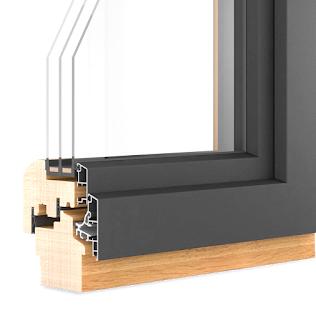
Triple glazing: Overkill for most U.S. climates, but
maybe not so for sound attenuation.
•  Double- and triple-glazing for improved R-values (a measure of an assembly’s resistance to the flow of heat—the higher the number, the less heat is conducted). Many states have made double-glazed windows all but mandatory, since they’re at least twice as efficient at retaining heat. Triple glazing performs even better, although the additional investment is seldom worthwhile in a mild climate. However, because the air captured between multiple panes of glass also serves to reduce noise transmission, you may want to consider using triple-glazed windows in rooms facing traffic noise or other unwanted sound. 

•  Inert gases sealed between the panes of double  and triple glazing. Gases such as argon conduct less heat than ordinary air, thereby improving the insulating value of the window assembly.

•  Vastly improved hardware and gasketing, which provide an airtight seal against infiltration of cold outdoor air, along with thermal breaks to prevent heat from being conduct ed outdoors via the window frame. Aluminum, in particular, is a notoriously efficient thermal conductor, so many window manufacturers now interpose less conductive materials such vinyl or rubber between inner and outer frames to help stem the flow of heat.

Today, American windows are almost on par with
European ones. Almost.
•  Low-e glass, which captures the sun’s warming infrared rays and prevents them from being re-radiated to the outdoors—a sort of one-way valve for heat—and UV-filtering glass that blocks ultraviolet radiation, which helps reduce fading of interior surfaces such as carpets, drapes, and furniture. 

Taken together, these improvements have saved countless millions of barrels of oil and kept who knows how much carbon out of the atmosphere. Granted, they took a generation to enter the mainstream of US building practices, but in the face of today's ever-more alarming changes in climate—well, better late than never.   

Monday, June 4, 2018

SOME CONCRETE INFORMATION

The Romans had already mastered the use of
poured concrete when the dome of the Pantheon,
shown here, was completed in 125 AD.
Concrete or cement?  Getting these two terms, uh, mixed up—is  just one of common misconceptions about concrete, an ancient and honorable material that’s frequently misunderstood.

When most people use the term cement, they really mean concrete—a mixture of sand, aggregate, and cement powder. It’s the cement powder alone that forms a paste when water is added, and through a magical process called hydration, solidifies and binds the sand and aggregate into the familiar stuff that makes up your garage floor.

Concrete’s ubiquity in modern architecture makes many people think it’s a modern material—another misconception. In fact, the Romans were already using a type of concrete, called pozzolano, some two thousand years ago. It was made from volcanic ash—of which they had plenty—and Roman engineers cast it into all kinds of sophisticated shapes, including the coffered dome of the Pantheon.

No straight lines here: Known as the Flintstone House,
this residence in Hillsborough, California was built in 1976
using Gunite sprayed over a metal armature.
(Architect: William Nicholson)
As the Romans quickly realized, concrete has some remarkable properties that set it apart from most building materials. It’s plastic, which means it’ll assume any shape you care to mold it into. Unfortunately, you usually have to build a lot of complicated formwork to contain it first, which can be an expensive proposition. That’s why most site-built concrete structures have rather uninspired flat surfaces.

However, free-form shapes can be created without the need for complex formwork. There are a couple of ways to do this. In one, a special type of concrete is sprayed over an armature of reinforcing steel. The process, known by the trade name Gunite, is commonly used to form the soft curves of swimming pool shells; however, it’s occasionally been used for entire buildings as well.

Acid stained and polished concrete,
available in a host of colors and
gloss levels.
Another method of making free-form shapes, known by the trade name Shot-Crete, can be used to "pour" structural walls without the need for formwork to contain the concrete. Here, an especially stiff concrete mixture is sprayed against a relatively light "backstop" until it's built up to the correct wall height and thickness. Shot-Crete differs from Gunite in that it's mixed and pumped from the truck, while Gunite is mixed with water only at the nozzle.
In recent years, concrete’s reputation has been sullied by its association with dreary structures such as multilevel parking garages. But it’s far from a dull material. It can be finished in myriad ways, many of them both expressive and economical. Here are just a few such techniques:

•  Scoring—inscribing lines into the wet concrete with a special tool—is one of the easiest yet least-used ways to create an interesting finish. Scoring can be done in any pattern, though simple designs are usually best. It’s important that the job be done by someone with experience, however, since mistakes will be embarrassingly permanent.

•  Coloring. Concrete can be integrally colored by adding pigments directly into the mix, or else color can be dusted onto the wet surface in powder form and troweled in.  Both methods are durable and attractive. Don’t mistake integral coloring with superficial painting, however; the latter is far less durable.

Impressed concrete ("Bomanite") is available in an array
of convincing masonry textures. This one is a dead ringer
for cobblestone set in a traditional fan pattern.
•  Acid staining. This applied color finish works by reacting with certain minerals in the concrete surface, creating intriguingly subtle variations in shading. However, it only works with concrete that hasn’t been previously treated.

•  Texturing. The range of concrete textures is limited only by the imagination. That familiar mid-century favorite, the exposed aggregate finish, is just one possibility among many. Others involve troweling in rock salt, which eventually dissolves to leave a rye-cracker-like finish, and sandblasting, which exposes the fine aggregates near the surface.

•  Impressing. This process, best known under the trade name Bomanite, involves pressing molds into the wet concrete to create spot-on renditions of cobblestone, brick, and tile and tile. These mock effects are even more convincing when the concrete is appropriately colored first. One of the few drawbacks to impressed concrete:  Cost, which is on the premium end of the scale.