Monday, January 30, 2017

ALL ABOUT HEATING

This was high tech in the 1890s:
Radiators used steam or hot water piped
through heavy cast-iron elements.
They got very, very hot.
If you woke up on an icy morning in 1870, the first thing you might do is lug g a bucket of coals up from the cellar and build a fire on the grate.  Makes nudging a thermostat sound pretty easy, doesn’t it?  Heating systems have come a long way since coal fires, but there’ve been a few detours along the way.    

During the late Victorian era, large homes were heated by steam radiators connected to coal- or oil-fired boilers. But while steam heat was clean and comfortable, it was also temperamental.  The systems became encrusted with scale, lost efficiency, and leaked.  


Old style "octopus" gravity furnace, which had to be
below floor level to work. When basements began
to go away, so did this style of furnace.
The cost and complexity of steam systems impelled a change to simpler warm-air gravity furnaces around the turn of the century. Some used ducts to distribute warm air from the basement to individual rooms, while others had a single large floor grille optimally positioned to barbecue your feet. Both types relied on the fact that heat rises to distribute warm air throughout the house—plausible, but not always successful.

Following World War II, the sluggish air distribution of the gravity furnace was finally remedied by the addition of an electric blower that also allowed for smaller duct sizes. Such “forced-air” furnaces, basically unchanged, remain the most popular heating systems in use today.

Forced-air furnace, circa 1970 or so.
Compared to modern versions,
it's a real energy hog. If you've still got
one of these, think about replacing it.
A few other heating systems have come and gone in the meantime, however.  
In the Fifties, radiant heating using hot water pipes embedded in concrete floor slabs made a promising entrance—and a humiliating exit after leaks required countless slabs to be jackhammered up for repair.

By the early Sixties, cheap electricity made electric resistance (coil) heating look like the wave of the future. Clean, compact, and cheap to install, it was just catching on when the lid blew off oil prices. Suddenly electricity (much of it generated by oil-fired plants) didn’t seem like such a cheap heat source after all, especially compared to the lower cost-per-Btu of natural gas. The passage of energy-efficiency regulations, beginning with California's Title 24 standards of 1978, gave watt-gobbling resistance heating the coup de grace by  discouraging its use in residential buildings.

What’s left?  Here are a few of the most popular heating systems in use today:  

Electric baseboard heat: Once
the wave of the future, now
a big no-no.
•  That old warhorse, the forced-air gas furnace, is still the most common residential heating system because of its low initial cost and high reliability. Modern units are now up to about 96% efficient—far better than the dismal 50-70 percent efficiencies of earlier furnaces. On the down side, forced-air furnaces can be noisy, and because they recirculate particle-laden room air, they can aggravate respiratory conditions.  

Radiant heat tubing laid out in preparation for
pouring of gypsum concrete. If you always
have cold feet, this is the system for you.
•  Heat pumps, which work on the same principle as refrigerators, have the added feature of integral air conditioning. Because they use the same type of duct system as gas forced-air units, they’re well-suited for retrofitting. Technically, heat pumps are better than 100% efficient (they yield more energy in heat than they consume in electricity), though these savings are offset by the higher cost of electricity versus gas. They also have a substantially higher first cost, and require a bulky condenser unit that must be located outside the house. Heat pumps work best in a mild climate, as their efficiency drops quickly in very low temperatures.

•  In-floor radiant heating, much improved since the Fifties, has been making a comeback. Radiant systems using hot water tubing embedded in floors are clean, quiet, and comfortable, though their first cost is high. Also, since radiant systems don’t circulate air, a separate means of ventilation is sometimes advisable.

Monday, January 23, 2017

CLASSICAL COLUMNS: Your Order Is Ready

The classical Greek orders: Doric, Ionic, and Corinthian.
Note the difference in slenderness between the earliest
(Doric) and latest (Corinthian).
All the current yakking about Washington has got me to thinking about—what else?— classical columns. While they do still show up in designs these days—now and then supporting a porch roof, but more often just a coffee table—you’d never guess that columns once formed the very heart of Western classical architecture.

In ancient Greece and Rome, the design and use of columns was carefully prescribed according to aesthetic laws derived over centuries.  The degree of aesthetic perfection achieved by the Greeks in such examples as the Parthenon is the stuff of legend.  

The Roman architect Vitruvius, who lived during the time of Christ, set forth the design of classical columns into the three Greek “orders”.  Each had its own characteristic design and proportions, as well as the proper degree of “entasis”—the slight bulging of the shaft which suggests tensed muscles carrying a load.    


The Lincoln Memorial sports a "colossal order" of
massive and primitive looking Doric columns.
(Architect: Henry Bacon; completed 1922)
As recently as a century ago, a good part of an architect’s studies were still devoted to a thorough understanding of the classical orders. After all, columns were still the single most important element of monumental architecture.  Try to imagine a city like Washington D.C. without them.

The Doric order is the oldest and most powerful of the three Greek orders.  Stoutly proportioned, lacking a base, and topped with a heavy slab-like capital, it still hints at the column’s ancient ancestors made of wood or bundled reeds.   


The Treasury Building is another, older D.C. landmark,
this one having Ionic orders. Here, the Ionic order's
usual difficulty in "turning the corner"
is avoided by having only one line of columns.
(Architect: Robert Mills; completed 1842)
The more refined Ionic order features two decorative “volutes” (what most of us would call curlicues) on either side of the column’s capital.  This design confounded the perfection-seeking Greeks in one respect, however: when placed on a corner, the side of the volute was exposed, making it difficult to “turn the corner” gracefully. Hence, later Ionic columns placed the four volutes diagonally, giving the column the same appearance from both the front and side.
  
The Corinthian order, the most ornate of the three, is proportionately taller than the others and features a capital ringed with acanthus leaves and fern fronds, terminating in four miniature volutes.  


The Supreme Court building flaunts the most ornate
of the classical Greek orders, the Corinthian.
Where would D.C. be without columns?
(Architect: Cass Gilbert and Cass Gilbert Jr;
completed 1935)
The Romans, practical fellows that they were, simplified certain details of the Greek orders to reduce their expense.  With the addition of two further orders (Tuscan, which was unfluted, and Composite, a combination of Ionic and Corinthian), these slightly modified designs became known as the Roman orders. 
   
The classical orders remained well-entrenched in architecture until the arrival of Modernism in the 1930s. The Modernists did not cotton to tradition, no matter how ancient, and they quickly branded classical columns as elitist, representing as they did the architectural establishment and all that was wrong with it.  

A modern-day Tuscan column—one of the
modified Roman orders—executed in
fiberglass-reinforced plastic or FRP.
(Courtesy WesternSpindle.com).
Today, after an eighty-year hiatus, classical columns are again widely available in wood and cast stone, as well as high-tech materials such as fiber glass. Some are faithful reproductions of the Greek or Roman orders—one manufacturer’s literature even boasts that its reproductions are “based upon Vitruvius”.  There are also many other styles of columns offered, some patterned after Renaissance examples, and others that are just plain inventions. Stay away from extruded aluminum columns, which have no entasis and hence appear stiff and top-heavy.  

Sure, right now classical columns are used mainly for table bases and plant stands.  But after surviving for two thousand years—who knows?

Monday, January 16, 2017

THE PERGOLA: Made in the Shade

California architect Bernard Maybeck was
a master in building with wood, and nowhere
better than in the pergola structure of his
famed First Church of Christ, Scientist,
Berkeley.
I always get a blank look when I mention the word “pergola”.  A few people have even accused me of making it up.  Honest—I didn’t.      

A pergola is an outdoor structure that has two parallel rows of columns supporting a system of open roof beams. It’s more permanent than a trellis, arbor, or espalier, each of which is generally just a flimsy framework for plants to climb on. It's also a less formal structure than a gazebo, which usually has a radially symmetrical plan and a pitched roof.

I know it's January, but if you get started thinking about your pergola now, you can have it all finished and ready for summer.

Craftsman-era architects such as Bernard Maybeck and the brothers Greene well knew that a pergola extending from the house into the garden softened the transition between indoors and out, as well as providing a sensual respite from the hot sun. And indeed, on a hot summer day, a stroll beneath a graceful pergola overgrown with fragrant vines can be a memorable experience.


Stout columns with recessed panes are paired
in this handsome and unusual pergola design.
(Courtesy GardenStructure.com)
Since the pergola consists only of columns and an open roof, it’s also a delight to design and build. It has only two functional requirements: To provide shade for humans, and to provide support for climbing plants. The rest is up to you. 

The pergola’s columns should be substantial and not spindly—4x4s, for example, will look like toothpicks in the scale of the outdoors. While you can of course use off-the-shelf classical columns, it’s a lot more fun to come up with your own design. Try experimenting with hollow box columns, building them up to a substantial girth out of stock lumber. Because there’s so little actual material in these columns, you can lavish great detail on them at modest expense. Try adding moldings or decorative motifs, ceramic tile accents, or materials such as iron or copper.  You can even incorporate lighting fixtures if you want to get fancy. 

 Heavy timber makes for a pergola that's both better looking
and more resistant to the ravages of weather.
(Courtesy of deedsdesign.com)
The pergola’s columns usually carry heavy primary beams, which in turn support a secondary set of smaller beams at right angles to them.  If the primary beams run crosswise, the pergola’s width will be emphasized; if they run lengthwise, its length will. Both primary and secondary beams can be cantilevered (extended beyond) the columns, and they can be finished with decorative end cuts such as Maybeck’s trademark “dragon’s mouth”.  Again, the heavier the lumber, the better. Avoid using skimpy  members such as 2x4s, since they look insubstantial outdoors and will quickly warp and fall apart. 


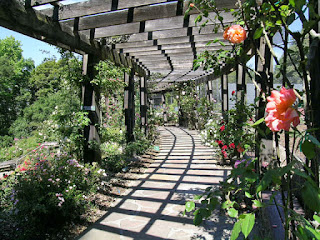
Long curving pergola—this one in Berkeley's
municipal rose garden—invites strollers to explore.
(Berkeley, as you can see, is a sort of pergola nexus)
Finally, a network of spaced wood members—that is, some form of latticework—is usually placed on top of the secondary beams. Although redwood lath is often used, it’s really too flimsy to hold up under the summer sun, and will warp and split after only a few seasons.  Try  1x2 or 2x2 redwood instead, and to lessen the chance of warpage, screw the pieces down rather than nailing them.  

The topmost members are usually installed “self-spaced” (having a gap equal to their own width between them).  This provides a nice dappled mixture of shade and sun, and allows climbing plants to get a good grip.


A simple two-column pergola turns an
ordinary gate into a genuine entrance.
(Courtesy deedsdesign.com)
California redwood is the customary lumber for building pergolas. You can also use pressure-treated ("Wolmanized") Douglas Fir, which is much more affordable, if you don't mind the visible needle marks in the surface. If you feel guilty about using redwood for environmental reasons, as I sometimes do, console yourself with the fact that a well-designed pergola such as yours may well last half a century or more. Many of Bernard Maybeck’s already have.

Monday, January 9, 2017

NO BORING STAIRS NEED APPLY

 Grand Staircase of the Paris Opera House or "Palais Garnier".
(Architect: Charles Garnier. Completed 1875)
From medieval times all the way up to World War II, the staircase was the focal design element in a multistory house. Stairs were built in myriad forms, from U- and T-shaped plans to curving and circular ones and even, in one case, as double spirals nested one inside the other.

Following World War II, interior architecture became increasingly ascetic, due both to the rise of Modernism and the need to build postwar tract homes as quickly and cheaply as possible. Staircases became unimaginative functional elements that were often completely enclosed, or else guarded by flimsy iron railings.

Curved stairs made a comeback during the 1970s,
when tract builders noticed that they
seemed to spark buyer interest.
During the 1970s, however, developers began to notice that homes with unusual staircases, such as curved ones, seemed to sell faster.  The public had spoken with its pocketbook, builders responded, and  today a bold staircase once again forms the focal point of many interiors.

Here are a few ways to make your own stairs worthy of Scarlett O’Hara:

•  The stair configuration is the most important aspect of a staircase’s design. Straight stairs are space-efficient, but are generally less dramatic (and more dangerous) than L- or U-shaped stairs with an intermediate landing. Landings also provide an opportunity for overlooks or seating that can add great spatial interest.

 • Stairs should be as broad as space allows. Three feet is the minimum width prescribed by code, but anything more is a big improvement.  If you don’t have the space to make the entire staircase wide, create an illusion of width by using wide treads up to the first landing and narrower ones thereafter. At the bottom of the stairs, try using a “ bullnose” step that’s broader and “spills out” into the room. The bullnose furthers the illusion of added width, and its funneling effect makes the staircase more welcoming.  .  

 The bottom "bullnose" tread of this staircase gives an illusion
of additional width. The convex forward bulge
gives a more dynamic and welcoming appearance.
Another visual trick is to make the bottom few treads “bulge” forward in an increasingly convex shape, which further intensifies the dramatic “spilling” effect. Both of these effects are relatively inexpensive if the stair will be completely carpeted; however, if hardwood is used, they can add appreciable cost.

•  Balusters—the vertical elements of the rail—shouldn’t be spindly and insubstantial. A wide range of sturdy wood balusters are available at lumber and hardwood dealers; many of them are designed to work with stock hardwood handrails and don’t require a lot of custom joinery. Metal balusters, too, can be specified in heavier sizes, and can be spiraled or have additional elements welded between them.

The newel post can be an artistic statement
in itself. Just mind the various code
requirements for baluster spacing
and rail height.
Remember that the space between balusters must be such that a 4” diameter sphere cannot pass through. The handrail must be between 34” and 38” above the nosing (the front edge) of the stair treads, and the rail itself must have a grippable shape between 1 1/2 inches and 2 inches in diameter.

• Adding a substantial newel post (the terminal baluster at the top and bottom of the stair rail) not only makes the rail sturdier, but also gives it a more monumental look. For a traditional effect, add a finial to the newel post.  There are lots of styles available at lumberyards, from spheres to acorns to pineapples.

Monday, January 2, 2017

SHHHHH!: Quieting That Confounded Noise

That confounded noise!
Ugh, that confounded noise! Whether it’s the rush of freeway traffic, the drone of a furnace fan, or just the faint tap-tap-tapping of your kid texting in the next room, noise in the home can drive you crazy.

Noise is simple to define: It’s any sound you don’t want to hear. For example, while you may happily tolerate the whine of jet engines at an airport, hearing them in your living room would be something else entirely. Their sound is transformed into noise.

A solid wall is a little like a giant drum head.
Staggered double-stud construction reduces
impact noise by "de-coupling" wall surfaces.
Noise consists of sound waves whose behavior, while theoretically predictable, is very complex. Even acoustic engineers can’t always figure them out—witness the number of concert halls with bad acoustics, or those freeway sound barriers that actually increase traffic noise in homes some distance away. Nevertheless, there are a few simple guidelines that can help you keep out unwanted sounds.

Noise travels via two paths—through the air (airborne noise), and through materials (impact noise). Both have to be addressed in order to contain a noise problem. The sound of that drunken twit banging on the wall next door is an impact noise. It’s usually of low frequency, and it’s best contained by isolating (or “decoupling”) the two surfaces. One way is to build a double wall between the spaces, sometimes using different stud sizes and gypsum board thicknesses to prevent sympathetic vibration. Other methods use special resilient channels to “float” the gypsum wallboard on its supports.

Resilient channels are used to
"float" gypsum board atop
the wall studs, allowing it
to absorb some of the sound energy.
Airborne noise—the screech of somebody else's kid playing a violin, for example—is usually of higher frequencies, and it’s relatively easier to damp. Sound-absorptive materials such as fiber glass blankets can be placed inside walls and ceilings or, in existing buildings, materials such as acoustic tile or tackboard can be installed on the face of surfaces. The softer and more absorbent the material, the more airborne sound is absorbed. That’s why carpet is often used as a sound dampener on airport walls.

A gap this size around an outlet box is
enough to completely negate any
soundproofing in the wall. 
However, putting sound insulation in a dividing wall can only solve part of an airborne noise problem. Any penetrations in the wall—even as small as the cracks around receptacles—will continue to transmit a surprising amount of sound. Such penetrations have to be carefully tracked down and filled with calk or foam materials. The idea is to get the wall literally airtight, since without a pathway of air available, airborne sound waves can’t travel.

A commercial water hammer
arrestor, especially advisable
near laundry machine faucets.
Many common noise problems are best addressed in the construction stage. Water hammer in pipes can be reduced by making sure that all piping is securely attached to the framing, and by placing isolators or expansive foam in the holes that pipes pass through. Commercial water hammer arrestors are also available.

The drone of a forced-air furnace fan can be muted by locating the furnace outside  the living space, and by placing the return-air intake (which is like a superhighway for furnace noise) some distance from the furnace itself. The rushing sound of air exiting from registers can be reduced by increasing the register size and hence reducing the air velocity through the diffuser vanes. External sounds such as highway noise can be damped by using triple glazing in windows, adding drapes, and even by planting leafy greenery outside the house.